Thursday, September 4, 2008

Squeaky: Drive Mockup

Squeaky: < prev | next >

Squeaky the Record Cleaning Machine is coming along nicely. Last night I spent a few minutes mocking up the drive mechanism (left) after a short trip to the hardware store.

If you look closely, there is a nut between the white plastic driven sprocket and the motor sprocket, slightly off-center. That is the pivot point for the drive chassis. With a spring forcing the idler wheel against the platter as shown, precision mounting isn't necessary, the amount of force can be made adjustable, and the device is wear tolerant.

The pivot itself is super simple as the series of pictures below demonstrate. A bronze bushing is press fit into a block of wood (below left) and a 3/8"x2" bolt slides through the bronze bushing acting as the axle.

The non-threaded portion of the bolt rides in the bushing. The two serrated lock nuts (below center) clamp onto the drive chassis which required one of the existing holes to be enlarged. Note the washer pictured below. It's probably unnecessary and will just wear out; it would be better for the nut to ride against the bushing directly.


The block was a bit thicker than the bushing so for the mock up, a hole in the block on the bottom side (above right) allows the bolt to slide up against the bottom of the bushing and also allows the entire assembly to be mounted to a flat surface without interference.

I realize none of this is very pretty. It is a mock up after all. Now that I have a sense of how it goes together, I'll revise the mounting blocks for the platter and drive chassis, making them one block, and more compact. If you can't tell I am pretty much making this up as I go, rather than trying to draw / draft it all out ahead of time.

Meanwhile I'm in the process of procuring some inkjet printers that will donate their stepper motors for controlling the motion of the cleaning, scrubbing, vacuuming arm(s). My only concern with using stepper motors is the expense of a controller. Other alternative: a cheap servo, if it is strong enough to do the work.

Squeaky: < prev | next >

Thursday, August 28, 2008

Squeaky: Platter Drive

Squeaky: < prev | next >

One of the key features of a record cleaning machine is the ability to spin the record without manual intervention. I'm getting really sick of cleaning records by manually spinning them on my turntable while I scrub.

Some folks on AudioKarma.org had suggested use of a bread machine, presumably because it uses a fairly high torque motor and some kind of gear reduction.

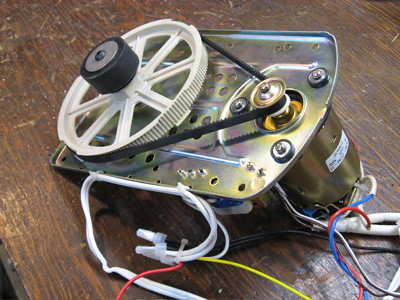
Upon dissecting the $2 bread maker I got from Goodwill, I found a metal plate onto which a motor and drive mechanism are mounted. As shown in the pic to the right, the motor drives the stirring mechanism on the opposite side of the plate via a tooth belt.

The white cog wheel is attached to a stainless steel drive shaft riding in a bronze bearing by way of a 6mm nut. The drive mechanism is attached to the drive shaft and engages the stirring gizmo in the bread bucket to stir and knead the bread, similar to how the blades of a blender are coupled to the blender motor.

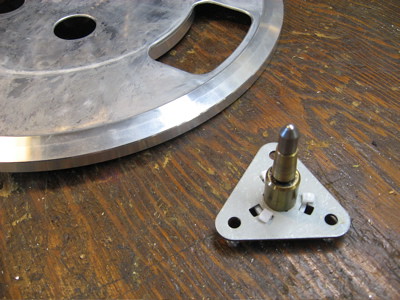
But how to drive a turntable platter? The two I had on hand spin on greased bearings attached to a mounting plate to affix them to a horizontal surface (see pic to the left).

They are both from belt drive turntables. Should I try to use a turntable belt? These are usually low tension belts and will slip with the slightest drag on the platter. I needed a higher torque, higher traction solution.

I want to keep this simple, cheap, and practical with minimum fabrication involved; I don't have a machine shop and I don't want to spend a fortune on this project. Those constraints eliminate a lot of design options. Direct drive would've required fabrication of some type and possibly re-engineering the drivetrain making this an unnecessarily hard problem to solve.

Why not drive the platter rim with a rubber idler wheel attached directly to the 6mm threaded end of the drive shaft? A trip to the hardware store and $18 later I had a pile of options. What ended up working best was a rubber hole plug mounted to a shaft extension. You can see the black idler wheel in the top pic.

To extend the shaft, I used a 5/16" x 1.5" aluminum spacer, basically a hollow aluminum tube, which I threaded with my new 6mm x 1.0mm tap. (Aluminum being a softer metal is easier to tap especially with an incorrectly sized hole).

I disassembled a 1-3/4" hole plug (a rubber puck sandwiched between two plates, compressed by a nut and bolt to squish out and fill a hole). The hole plug rubber piece slid over the aluminum spacer shaft, and with washers on top and bottom and a 6mm cap end bolt on top to cinch it down, et voila, rubber idler wheel.

As a bonus, the gear reduction afforded by this small wheel driving the large platter means the record will spin at a goldilocks speed: not too fast, not too slow, but just right.

Next step is mounting the drivetrain and platter on a chassis. I want the idler wheel to apply user-adjustable pressure to the platter. It adds complexity to the design but it makes up for imprecise mounting, lack of trueness of the drive shaft and more importantly, accomodates wear of the rubber wheel.

Eventually, the motor is to be computer controlled. Before that is possible, I'll need to break out my copy of DC Power Supplies: A Technician's Guide and build a dual voltage supply for the electronics and motor of the robot. I've never built an wall-powered DC supply before... fortunately I can reverse engineer the bread maker supply to help.
Squeaky: < prev | next >

Monday, August 25, 2008

Squeaky the Vinyl Cleaner Robot

Squeaky: | next >

I have a new robotics project! Well, sort of robotics. It's a DIY Record Cleaning Machine (Robot). A couple months ago, while searching for electronics to scavenge parts from, a very generous individual gave me a couple of vintage stereo receivers.

This started a fast plunge down the slippery slope into a new hobby of vintage audio. With a new-to-me Dual 622 turntable, out came all my old records. Old, filthy records, that is.

It's dirt and other build up in the grooves that causes pops and crackles and surface noise that made CDs such a hit when they were introduced. LPs have a lot more potential than many folks these days are aware of. But realizing that potential hinges heavily on meticulous, thorough cleaning, stylus care and other tedium.

While one can use various methods to clean the crud out of vinyl grooves, the best way is to scrub it with a liquid cleaner and then vacuum it away using a purpose-built Record Cleaning Machine (RCM).

Several great folks at AudioKarma.org described building their own RCM at a fraction of the 3 and 4 digit price tags of new machines. These do it yourself machines are usually manually operated. So I figured, hey, why not build a record cleaning robot, fully automatic, computer controlled, etc? And why not name this robot Squeaky (as in squeaky clean).

The end goal is a machine that, after placing your record on the platter, will apply record cleaning fluid, gently scrub the grooves, vacuum off the liquid and crud, then apply a rinse solution, and vacuum that off as well. The result is a record nearly free from pops and crackles, with minimal surface noise and a very enjoyable listening experience.

What I have so far includes two old turntable platters I was given by a couple of very kind people; a DC motor, reduction belt drive, and drive electronics from a bread making machine and a tiny portable vacuum with hoses and attachments purchased on sale at Goodwill for under $7. I've got a Baby Orangutan that I'll steal from the Sparky project for use as the brain. In addition to the hardware, I've been researching and practicing various record cleaning techniques and cooking up a bunch of half baked design ideas. I'll post updates as I make progress.

Squeaky: | next >